
With Quick Timecard Links, users can swiftly view timecards directly from the search page of the EPP. Say goodbye to the hassle of navigating multiple clicks into employees' profiles. This feature streamlines the process, saving you time and effort. Available to all worksite users with custom permissions to view timecards via the web.
A custom permission to view timecards is required for this feature to be visible to users, this can be configured on the user details page of EPP:
In the EPP for worksite users, a link to quickly view the employee’s timecards is now available when searching for an employee.


Our latest update introduces Supervisor PINs to the EPP. With this feature, worksite users can easily assign supervisor PINs to team members, enabling supervisors to seamlessly execute necessary tasks directly from the terminal. This feature is accessible to all worksite contact users and those granted permission via the web interface.
In the Configuration Dashboard of EPP, a configuration is available so that a worksite can choose to allow users to set their own PIN:

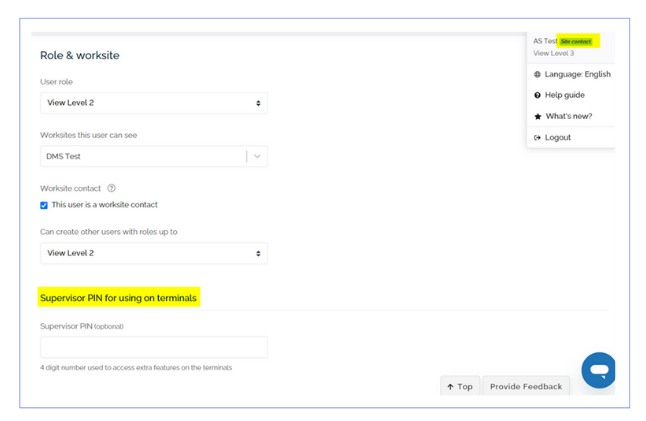
A. If the user has the appropriate permission, the supervisor PIN is accessible in the EPP on the user details page:
B. Additional permissions will be available once the 4-digit pin is entered, only permissions that the user has turned on will appear
C. If the user has access to create another user, information on up to what level they can create has also been made available as part of this project

Worksite users will now be able to add supervisor PINs to their own profiles, it should be 4 digits long and will be hidden by an asterisk (*).

Worksite users will now be able to add supervisor PINs for another user profiles, it should be 4 digits long and will be hidden by an asterisk (*). The editor must be a worksite contact to be able to see the option for ‘Supervisor PIN for using on terminals’
A. Editor is a worksite contact user
B. Editor is a non-worksite contact user

Worksite users can efficiently add multiple visitor hosts in one go. With this convenient feature, you can easily bulk import hosts directly into the system. Accessible via the web interface, this enhancement offers a seamless experience for managing your visitor hosts.
1. Access import visitor hosts from the EPP > Go to Visitor Management > Click Visitor hosts > Click the Import icon (Bulk upload visitor hosts) next to ‘+ Create host’

2. Upload the file and click ‘Upload’ to bulk import visitor hosts. Users can import a maximum of 50 visitor hosts at a time using the ‘visitor hosts import template’ – this can be downloaded from the ‘Bulk import visitor hosts’ pop-up.

3. After uploading the file, you will be presented with:
A. A success screen showing how many hosts were created
B. If any of the uploaded records failed, information on how many hosts were created as well as the count of records/rows that failed during the upload and the reason why they weren’t created

4. The imported list of visitor hosts will be displayed on the ‘Predefined hosts’ tab - these can be edited or deleted if required to do so.

Now, with the latest update, editing custom IDs for your workforce directly within their profiles is a game-changer, provided the system is configured accordingly. This feature, accessible via the web and subject to custom permissions, enhances flexibility and control over employee data.
Client and worksite configured custom IDs can be set to be editable by Damstra staff. Once set to be editable by Damstra staff, it can also be set to be editable by View level 1-3 users who has custom permission to do so.
A. Settings for the client configured custom IDs can be found in the Configuration Dashboard of EPP > Overview & Clients Details – Custom IDs. Client configured custom IDs can also be set to override the Damstra ID number.

B. Settings for the worksite configured custom IDs can be found in the Configuration Dashboard of EPP > Sites – Custom IDs.

If the custom ID is set to be editable by View Level 1-3 users, they will also need to have the additional custom permission ticked on their user accounts to be able to edit custom IDs.
This can be configured by going to the user details page of EPP for worksite:

A. Custom IDs can be viewed and edited from the employee’s profile in EPP:
B. Employee and Employment Details have been merged into one section with different tabs in it
C. ID numbers that can’t be edited will be static while editable ones will display in a text field/form
D. Client & worksite users will only see custom IDs that are relevant to them

Custom IDs are now displayed on the employee’s profile top summary for all users - worksite, company, and employee users.

Users can effortlessly choose organisation-wide qualifications within the Health & Safety calendar while creating or modifying sessions. This feature is accessible to all users possessing the relevant custom permissions.
The user accounts need to have the custom permission on to be able to select organisation-wide qualification skills when creating or editing a session in the H&S calendar.
This can be configured by going to the user details page of EPP for worksite:

Worksite users who have the appropriate custom permission on can now select organisation-wide qualifications when creating or editing a session in the Health & safety calendar. If the session is for multi-site, each worksite user account should have the custom permission on.
A. Creating a session in the H&S calendar:

B. Editing a session in the H&S calendar:
